Partitioning your hard drive is a useful way to organize files, improve system stability, and separate data. Windows 11 offers a built-in Disk Management tool to split and merge drive partitions without third-party software. In this guide, we’ll walk you through how to create and delete a partition step-by-step.
Why Partition Your Hard Drive?
- Separate OS, applications, and personal data
- Improve file organization
- Prevent system failures from affecting stored files
- Enable dual-boot configurations or backups
1. How to Create a Partition (Shrink Volume)
Step 1: Open Disk Management
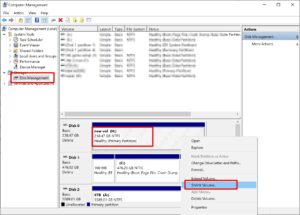
- Press Windows + X and choose Disk Management
- or search “Create and format hard disk partitions” from Start Menu
Step 2: Choose a Drive to Shrink
From the Disk Management window, right-click on the main partition (e.g. C:) and select Shrink Volume.
Step 3: Enter Shrink Size
In the shrink dialog box:
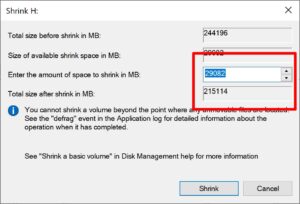
- Input space to shrink in MB (e.g. 10240 for 10 GB)
- You can enter any number depending on how much space you want to shrink.
For example, if you want to shrink by exactly 100 GB, multiply 100 × 1024, which equals 102400 MB.
Enter that number in the box to allocate precisely 100 GB.
(Note: You can input large numbers like 1,000,000, but the system will automatically limit it to available free space.)
Step 4: Create New Volume
You’ll see Unallocated space. Right-click on it → New Simple Volume and follow the wizard:
- Choose size
- Assign a drive letter (e.g. E:)
- Use NTFS as file system
- Set volume label (e.g. Data)
2. How to Merge (Extend) a Partition
Step 1: Delete Extra Volume
Right-click the extra volume → Delete Volume. Make sure to back up files before deleting.
Step 2: Extend the Original Volume
Right-click on the main partition (e.g. C:) → select Extend Volume. Use the wizard to merge the unallocated space.
Check in File Explorer
Open File Explorer and confirm that the new partition or extended space is visible and usable.
Final Tips for Disk Partitioning
- Backup important data before making changes
- Label volumes clearly
- Use NTFS file system for best compatibility
- Keep OS and personal files on separate partitions
FAQs
1. Will I lose data when partitioning?
No, shrinking a volume doesn’t delete data. But always back up to be safe.
2. Can I merge partitions anytime?
Yes, as long as the partition to merge is deleted and unallocated.
3. Does this work with SSD?
Yes, the process is the same for SSD and HDD in Windows 11.
4. Do I need any third-party tools?
No, Windows has built-in Disk Management for this task.
5. Can I partition during OS install?
Yes, partitions can also be created during a clean Windows installation.
Conclusion
Partitioning your hard drive helps you manage data effectively and maintain system performance. Whether you’re adding a new storage section or merging drives, Windows 11 makes it easy with Disk Management. Follow these steps to create a cleaner and more organized computing environment.