As someone who works long hours at the computer, I’ve come to realize how much eye strain those tiny icons and file names can cause — especially on high-resolution screens. Everything looks crisp, sure, but also way too small. Rather than lowering my display resolution (which often makes things blurry), I looked for ways to make icons and folders appear larger while keeping the resolution intact. Good news: Windows gives you a few easy tools to do exactly that.
Method 1: Change Icon Size from the View Menu
![]()
This is the fastest way to enlarge folder and file icons, and you can do it straight from your desktop or File Explorer. Here’s what I did:
- Right-click on the desktop or inside any File Explorer window
- Hover over View
- You’ll see four size options:
- Extra large icons
- Large icons
- Medium icons (default)
- Small icons
- I picked Extra large icons, and immediately everything became easier to see
Note: This only changes the size of icons, not text or menus. It’s ideal if you just want to make folder thumbnails bigger without affecting the rest of your system.
Method 2: Scale Up Text and UI Elements (Without Touching Resolution)
If you want a more comprehensive change — meaning not just icons, but also menus, buttons, and text — Windows has a built-in scaling option that works great.
Here’s what I did:
- Right-click on your desktop
- Select Display settings
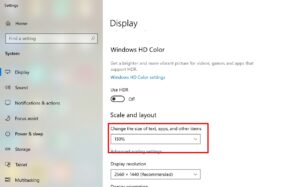
- At the top, under Scale and layout, you’ll see this option:
Change the size of text, apps, and other items - I increased it from 100% to 125%, and noticed an instant improvement
Most people find that 125% or 150% offers a great balance between readability and usability, especially on 4K displays.
Optional: Use Custom Scaling for Fine-Tuned Control
For even more precise control, I went one step further:
- In the same Display settings window, scroll down and click Advanced scaling settings
- Here, I typed a custom value — in my case, 200%
- Click Apply
- Windows will prompt you to Sign out to apply the changes
Once I logged back in, everything from my file names to application interfaces appeared much larger — and most importantly, they remained sharp and clear thanks to the unchanged resolution.
Final Thoughts
Whether you’re trying to reduce eye strain or just want a more accessible interface, these adjustments can make a big difference without sacrificing clarity. Here’s what worked for me:
- ✅ Made desktop and folder icons larger using the View menu
- ✅ Scaled up all UI elements without lowering screen resolution
- ✅ Tried custom scaling for even finer control
If you’re struggling to see small elements on screen, I definitely recommend giving these methods a try. It only takes a minute or two, but the comfort improvement is instant.
Want more Windows accessibility tips like this? Stick around — I’ve got plenty more coming.