Connecting to a shared network folder is essential for file sharing, collaboration, data access, and backups between devices on the same network. Whether you’re using Windows 11 or Windows 10, this guide will walk you through the process of setting up and accessing shared folders between PCs.
1. Create a Shared Folder on Windows 11
Step 1: Create a Folder for Sharing
On your Windows 11 PC, create a new folder that will be shared over the network. For example, create a folder named Network on your desktop or any preferred location.
Step 2: Enable Sharing for the Folder
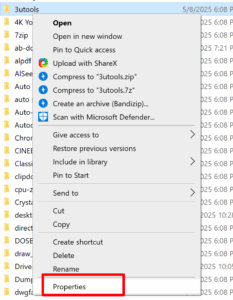
- Right-click on the folder → select Properties
- Go to the Sharing tab
- Click on the Share button
Step 3: Add a User for Sharing
In the “Network Access” dialog, choose the user account that should have access. If you’re unsure, you can select your current account. Click Share.
If you don’t have a specific user account to add, you can simply select your current account.
If you want to allow access to all external users, select Everyone from the dropdown list and click Add, then proceed by clicking the Share button.

Step 4: Confirm Sharing
Once the message “Your folder is shared” appears, click Done to close the window. Your folder is now shared on the local network.
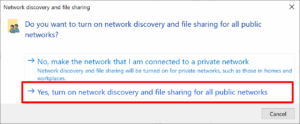
Choosing Yes enables network discovery and file sharing on all public networks, meaning your shared folder can be accessed by anyone connected to the same network.
For security reasons, it is recommended to only enable this on private networks.
2. Enable Network Discovery and Sharing
Step 1: Check Network Discovery Settings
If other devices can’t see the shared folder, you may need to enable network discovery:
- Open File Explorer → Click Network on the left
- If prompted with “Network discovery is turned off,” click the message
- Select Turn on network discovery and file sharing
Step 2: Set Your Network to Private
When prompted, choose to treat the network as Private. Avoid enabling sharing on public networks for security reasons.
Step 3: Confirm Discovery is Working
After enabling, go to File Explorer → Network, and you should see the name of your Windows 11 PC listed.
3. Access the Shared Folder from Windows 10
Step 1: Open Network in File Explorer
On your Windows 10 PC, open File Explorer and click on Network. Your Windows 11 PC should appear.
Step 2: Open the Shared Folder
Click on the name of the Windows 11 computer, and you will see the shared folder (e.g. Network) that you set up earlier.
🔍 Can’t See the Shared Folder? Try Manual Access
If the shared folder doesn’t appear under Network in File Explorer, you can connect manually using the network path:
\\ComputerName
Replace ComputerName with the name of the PC that shared the folder. This is the same name shown during the sharing process.
📌 How to Find the Network Name
- Press Windows + I to open Settings
- Navigate to System → About
- Look under Device name — this is your network name
For example, if your device name is My-PC-Name, you can type:
\\My-PC-Name
Step 3: Map the Shared Folder as a Network Drive (Optional)
If you plan to use this folder regularly, it’s recommended to map it as a network drive:
- Right-click on the shared folder → select Map network drive
- Choose a drive letter (e.g., Z:)
- Check Reconnect at sign-in if desired
- Click Finish
Conclusion
By sharing a folder on Windows 11 and connecting to it from Windows 10, you can seamlessly collaborate, back up files, and share important documents. This method is perfect for homes, small offices, or anyone needing efficient cross-device file access on a local network.
FAQs
1. Why can’t I see the other computer on my network?
Ensure network discovery and file sharing are enabled on both devices and that they’re connected to the same network.
2. Can I share folders without using a password?
Yes. You can disable password-protected sharing in Advanced Sharing Settings, but it’s not recommended for security reasons.
3. Is this method secure for public Wi-Fi?
No. Avoid enabling sharing features on public networks to prevent unauthorized access.
4. Can I share folders from Windows 10 to Windows 11 instead?
Yes. The process is identical in reverse. Just follow the same folder sharing steps on the Windows 10 device.
5. Do both computers need the same Microsoft account?
No. As long as both are on the same network and proper permissions are set, different user accounts work fine.